OK...
Let's imagine what a child would draw, if you asked it to draw a running man.
Which one, 1st or 2nd?

I think it's 2nd. Let's open Maya, bring character, set it up , create Quick Select Sets and create our first/last poses.

Blue are quick select sets selected. Let's position this guy a bit better, like below.
pic 1 pic 2

Shape hands, lower arms, bring the heels together and rotate feet outwards (red arrows on pic 1), tilt him a little forward to shift center of gravity, to make him "fall" (red arrow on pic 2. Yellow arrow shows center of gravity)

Pay attention to what controls you use when posing the feet. I recommend using foot controls in Red Rectangle.
Also note in Green Rectangle, feet parenting is set to World (World - 1, rest - 0).
pic 1. pic 2.

Get the feet OFF the ground, it's the air born pose, like in pic 1. Just like in a walk cycle, rotate the hips and counter-rotate the upper chest (red arrows in pic 2.).
This is our first and last poses. Lets make them frames 0 and 16.
Check your Graph Editor. It should look like in the pic below:

Blue is the Quick Select Sets. I keyed all the Body, legs and arms.
Now we just need to create our second air born pose. It's pretty much the same, only with left/right legs and arms switched. Pay attention to Graph Editor.

In red rectangles are the beginning and end of our cycle. Using the button in Blue rectangle, flatten the tangents.
Playblast should look like this. Click here
pic 1 pic 2

pic 1 above shows work on the breakdown pose. Red outline and arrow shows previous position of the "forward" leg and it's movement to the position on the ground. Underneath the character (or slightly back, to create forward streaming feel). Yellow outline and arrow show "backward" leg's movement. Basically I haven't done anything to it. Yet. Blue arrow shows Root movement down.
pic 2 shows up/down movement of the Right leg and the Root.
Not all is good with our Graph Editor. Look below:
pic 1 pic2

pic 1 shows slanted tangents, that leads to an "overshoot", area of the spline that protrudes beyond the key value. So our real key seems to be on the frame 3 instead of 4.
pic2 shows the way to fix it. Use the button in yellow cyrcle to flatten the tangent. Or use autoTangent.
Do this for both legs and visit the passing foot position. It needs some tweaking.

I used Toe Roll (in Yellow rectangle) and translated back and down. But it's a matter of taste.
The body looks stiff. We need to add some spine deformation. For clarity I'll use "concave/convex" movement.
pic 1 pic 2

Pic 1 is what we start from.
Pic 2 is spine, bent over (Red arrow). To add spring like motion to the spine, I used low spine to counter animate (yellow arrow) and moved the Root slightly backward (Green arrow).
Too exaggerated, I know. Let's keep it for now, just for demonstration. We're not done with Breakdowns yet. We have almost forgotten the left/right weight shift and arms.
pic 1 pic 2 pic 3

Pic 1 is shifting to the left. Translation of the Root, rotation of the torso to align the head with the center (almost)
Pic 2 is shifting to the right. Yellow outline is the neutral position.
Pic 3 is my Outliner with selected Quick Select Sets I used to created the poses.
Let's look at it
With the arms I'll simply bend out the elbows on the breakdowns. Both at once.
Pic 1. Yellow outline is position of the elbow before the adjustment. Yellow arrow is direction of the adjustment.
Pic 2. Selected ArmB on both arms (elbows)
Pic 1 Pic2

I'd adjust wrists as well and, perhaps, the arms.
Looking at the run from the front we notice that arms are moving in robotic manner. So we need to adjust it as well. I'd recommend adding sideways movement. It showed that my elbow movements need to be toned down. I can't look at the weird head nodding anymore, so I'd tone it down quite a bit together with the neck.
Time for in-betweens. Those poses when our guy's legs touch the ground and push him off the ground.

Right in-between frames 0 and 4 (frame 2) is where forward foot is touching the ground. (Yellow arrow). Pay attention to Foot controllers, the heel must be on the ground. Translate Y and Ball roll must be on "0" (in our case here). I'll leave the other leg alone for now (Green ?)
Our next in-between is on frame 6. Pay attention!

The backward leg is on the ground. Translate Y is on "0", touching the ground (in small yellow rectangle). To avoid knee over stretching I use Toe Roll. (in yellow rectangle). After adjusting the other leg as well we get this:a
Still needs something, right?
We need overlap of the body and arms. Let's start with the arms, it's easier.
pic1 pic2

Pic 1. The Elbow and the body moves down. Our elbow position (Yellow arrows) create sort of anticipation: moves up before moving down.
Pic 2 shows "Overshoot", when the elbow moves past the Extreme. (Extreme for the Root may not be Extreme for the Elbow. We still may call Character position Extreme or Breakdown, but we need to keep in mind that it's very relative. In reality frames 2 and 6 are Extreme for the Elbow, but if we keep on like this, our brain will shut off prematurely.)
After adjusting the elbow (and wrist) all the way to the end of the cycle, our Graph Editor will look like below.

And after adjusting both arms, we'll have this
Playblast much softer, isn't it?
Let's apply the same thinking to the body and make overlaps in the in-betweens.
Let's make those overlaps very exaggerated, so they will be noticeable. And don't forget to increase up/down on the Root.
Crazy!
Are we done?
One more thing about the tangents.
Let's look at left/right Root movements.
Yellow circles show flattened tangents. But these keys are not platoes, why would the tangents be flat?

Using the button in yellow rectangle, adjust the tangents. Do this to all splines, even if it means to go over all of them one by one.

And I really want you to look at my timeline. Yes, we have Extremes, In-betweens and Breakdowns, but it still looks organized and easy to read.
Now, when our crazy run is done, we can add last drop - offset of the splines. I'll leave the body alone and do it to the arms. Select right elbow and shift it one frame forward. Then select both wrists and shift the splines. Then do it to the head.
Here's what we've got.
Are we done yet?
Err... well, we are kind of done. How about one more last thing?
Let's take a look at the up/down trajectory of the backward leg?
Pic 1 Pic 2

Red trajectory is what we have. Boring. How about something like on blue trajectory?
Pic 1 is our initial position. Pic 2 is adjusted. Adjust it for both in-betweens and for both legs and...
Wait. Let's look at the pic below.

Yellow rectangle is the 2 frames it takes for the foot to get flat on the ground. Isn't it too long? How about One frame? Red arrows show our one frame range. Same for all legs. And while we are at it, let's play with in-betweens of the Root up/down.

Red trajectory is regular, neutral spline. Yellow rectangles are our In-betweens. How about moving the keys upward (Yellow arrows)? So he spends more time up and bouncing sharply off the ground.
Is that it? Nope. WHAT NOW?????
Oh, haven't you forgotten what I did for the walk cycle? We need to make sure the feet Translations on the ground are straight lines, otherwise we can't use this run cycle to simulate run across.
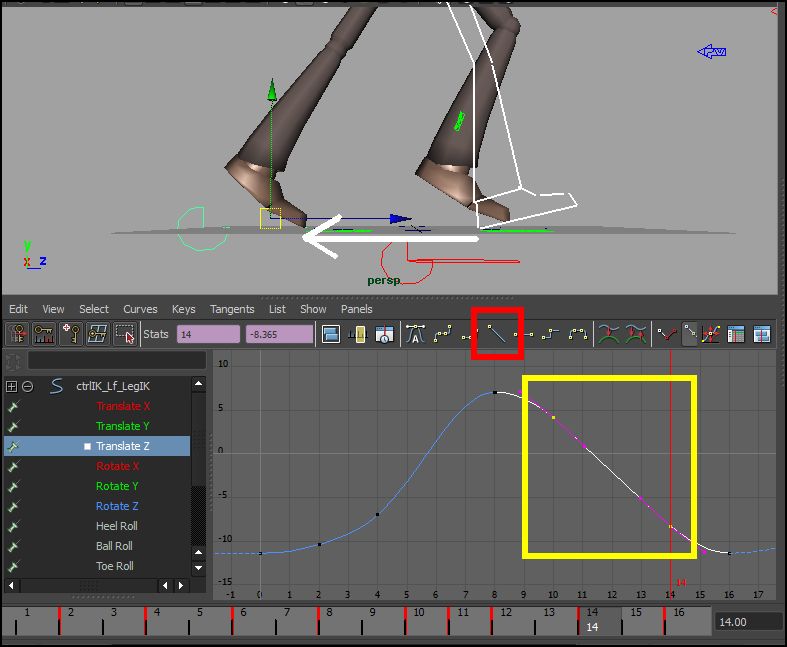
Yellow rectangle is where the stretch of spline is straight. Use the button in Red rectangle. White arrow shows Foot's "travel". I didn't have a key for the Translate Z in-betweens on frames 10 and 14, so I had to insert keys there. Same for all legs, bring down the Root even more and we have our final run.
And now look what our Timeline looks like
It has keys on every frame! Now if I need to change something, it will be very difficult, so before I start shifting the splines and creating one frame offsets, I should be very sure the animation goes the right way and I can change things before going to this mind blowing stage.
The End
No comments:
Post a Comment