Let's build trot across the terrain.
We need to build a terrain. (I did it using the Polygon plain, scaling it up, using vertexes and rotating, translating and scaling them. No fancy work here.)
Using world, move the horse away to beginning of it's path. Red line is the intended direction of the move.
Having experience of trot cycle, approximately eyeball how many steps this horse will make to the end of the journey. In my calculation it will need 6 steps. 16 frames per cycle, 8 frames per step. 48 frames! Set our timeline to 48 frames.
Let's set-up the horse. Look at "how to set up the character" post, look at "Quick Select Sets" post.
Having selected the Root ("cross" above the horse) and all it's legs, bring the horse to the end of the path. Look at Graph Editor and make the curves straight.
Now we can start working on the animation
Just as I explained in Walk Across post we need to start with passing positions.
But first let's divide the whole motion to 8 "steps". Just like in the pic below.
Considering that perhaps frames 0,8,16, 24 etc. are our extremes (up in the air poses),
Considering that perhaps frames 0,8,16, 24 etc. are our extremes (up in the air poses),
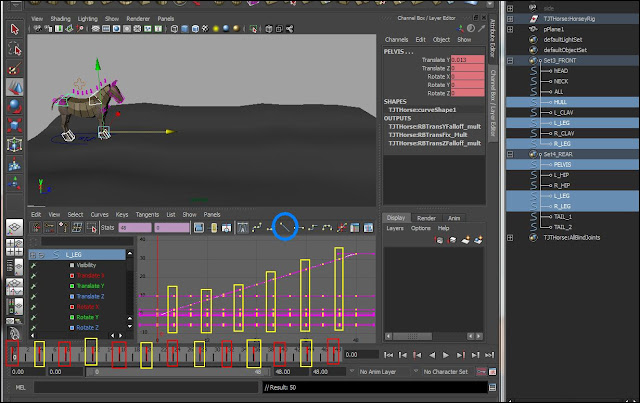
in-between them we'll find our passing positions. Let's mark them.
Please note selected controllers in Outliner, (right) in the quick select sets.
Red rectangles are extremes, yellow are passing pos., blue circle - straight line button.
In the passing positions we temporarily make sort of "stepping", just for visual reference.
Now we can start working on the Passing positions, making sure the feet don't intersect the ground, adjusting chest and rear according to the terrain.
For this I'd look at the feet from underneath to see the intersections.
Red circle with pointing at it red arrow is intersecting foot. We will translate it up and adjust it's rotations.
Time to create strides. Again, please look at thorough explanation of the process in "Walk Across" post. Here I will simply remind you that we are going to copy/paste back and forth from Passing position, using Middle Mouse Button. One foot at a time. I'll begin with rear left foot.
Red arrows show movement of the foot. Our curve begins to look like a "staircase". We need to adjust last section by eye, because there is nothing to copy from.
Looks like funky walk, doesn't it?
Same for all legs and it should look like this
Playblast
Playblast
I had to lower chest and rear, re-check position of the grounded feet (red arrows), lower passing feet and use Toe Roll to flip them (Yellow arrow and red rectangle).
Now we need to create those beautiful "air born" poses. But those extremes have the feet on the ground, right? If we lift them up in the air it will destroy those clever strides. Time for yet another set of divisions: in- betweens. Frames 2, 6, 10, 14 etc. Copy back and forth from passing positions. One foot at a time.
Red Arrows point at those in-betweens. Red "??" are places where they are missing. Red rectangles are in-betweens in the timeline and yellow are missing ones.
Let's continue until all the feet are done and all the in-betweens (where feet supposed to be on the ground) are created.
And now the trick! Go to the extremes and remove them. Remember, the horse is up in the air during the extremes, so the feet will be up too. Red rectangles are to be GONE!!! and our curves to be fixed with autoTangent (yellow rectangle).
Pic1
Pic2
Pic1
Pic2
Compare Pic1 and Pic2. Do it to all the legs.
Playblast
Playblast
12. Go to all of those air born extremes and adjust all the legs, point the hooves etc.
Check chest and rear extremes and create nice streamlined poses with the legs (look at the video footage). The amount of work increases. I had to adjust up/downs of the chest and rear for the horse been able to reach the ground in the in-between phases.
Playblast
Playblast
13. Time to counter-animate neck and head. Remember? the chest goes up, the neck goes down. Green curve is up/down of the chest. Blue counter-animation is rotation of the neck.
Playblast
Playblast
Neck moves a bit too much, but for the same of illustration it's OK.
Now we need to overlap the head. Same process as with the Trot Cycle (look up corresponding post).
Top curve is the neck's and bottom is head's rotation. I varied rotation of the head.
To finish this off, let's offset back animation 1 frame.
Select back legs and hips in Quick Select Sets, select them in GE and simply move one frame forward.
Finished section of the tail
Finished last section of a tail looks something like this.
Actually it may look like this too
And the finished Trot is here (The head may be moving less etc. But really, for the finished product we need different rig and the most important: Not the generic locomotion, but decide on the character of the animal and add those traits: nervous, calm, young and perky, old and wise etc.)
Playblast


No comments:
Post a Comment