Bring the character and check parenting of head, neck, shoulders, arms, legs and knees.
1. Head.
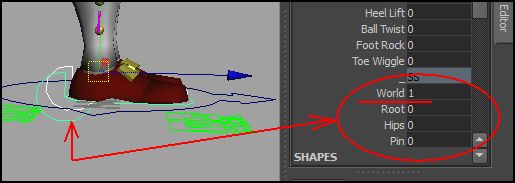
Click on the head controller and check it's parenting in the channel box.
These pictures below show several possibilities. We have "Parent", "World", "Root", "Chest". Let's turn "Root" on 1 (or World, doesn't matter for us now)
2. Next is the Neck. I'd leave it on the "Parent". Make sure everything else is put to "0".
pic1. pic2.

3. Shoulders don't have any parenting, but Arms do. Parent them to Root (Root on 1, the rest
on 0.)

4. Going down the body. Check the legs. We have knees (or Pull Vectors), lets parent them to World (value of 1) and, in case your Translate controllers are locked (gray color), Right mouse click on them, down to "Unlock Selected". Then move the knees away from the character. It will keep them steady. It's enough for us now.

We are ready to go. Let's position our character. Blue colored rectangle is where all my Quick Select Sets are.
Arms down, elbows bent, feet rotated outward (red arrows on pic1). I'd suggest to tilt charactr forward a little, to make him falling and out of balance (pic2).
pic1. pic2.

But what to start with? If we ask a child to draw a walking man. Which picture will most likely be done, number 1 or 2? I think number 2. Makes sense, right?

Pay attention to rotation of the pelvis and it's a good idea NOT to use Root for it if you can. Norman has "Hip" control that is perfect for the task.
Red arrows on the body show rotation of the hips and counter-rotation of the upper body.
When positioning the feet, don't use RotateX and Z (Blue Arrows). Instead use those foot controllers that are in the red rectangle. If you click on, say, Heel Lift, you can scroll it with Middle Mouse Button.

So, now, when we created our first extreme, we can select all our Quick Select Sets and set our first Key on frame 0 and 24. (Yellow ovals and arrows) Now we need to create similar pose on frame 12 and we'll have necessary Extremes.(Red Arrow)

Take a look at Graph Editor. Maya messed up the curves. Red Arrow points at dangerous "overshoot" and Yellow Arrows point at slanted tangents. We need to create "ease-ins and -outs", flatten our tangents.

Maya 12 has AutoTangent button (red circle) built in. If you use other Maya issues, download autoTangent.
Red Arrow shows the place, where an overshoot used to be. Yellow Arrows point at flattened tangents at the beginning and end of the shot.

All our Extremes are done.
Now it's time for passing positions (or Breakdowns). Right in-between the Extremes.
"Front foot" must be put flatly on the ground. It's sort of "hovering" above because we have both, Foot Roll and Heel Lift. We need to put both of them on 0. Make sure all Foot controls are on 0. Compare the two pictures below:

Time to position another foot, the one that's "travelling" forward.
Most common mistake is to jump right into it and begin using Ankle controller. DON'T.
See, how, when I used Rotate X, it begins to intersect the ground and needs to be translated up?

I would rather use Foot Roll and move the foot a little back and up. My Translate controllers are in Yellow Rectangle.

After we did our foot positioning, we need to tweak the root a little. Lets see. The first picture is too tall, the knee locks and he's not standing firmly. Second is too much down. Third is OK.
pic1. pic2. pic3.

Turn it up-front and observe. Very important issue is "Weight shift". Picture one shows our character perfectly up-right, but unbalanced. His center of gravity is still right between the feet, but he's standing on only ONE.
So we must move his body so the weight is resting on the grounded foot. I translated his Root to the Left, but compensated by bending his upper body to the right (red arrows). Yellow Arrow shows projection of his Center of Gravity.
pic1. pic2.

So we can look at it. Now it doesn't have to wiggle his butt,
but walk like a sailor, it's up to your tastes.
A walk is only half done without in-betweens, where the ups and downs of the body are. Green spline is Ty, Root's up/down. So far we have Extremes (frames 0, 12, 24), Breakdowns (6, 18) and need to make In-betweens (3, 9, 15, 21).

Bring the Root down on frame 3 (Red circle and yellow arrow down), next in-between on frame 9 is up (yellow circle and arrow up). Green arrows and circles are where next in-betweens supposed to be.

Before our next playblast let's look at the action of the feet.
So far we left the feet travel between Extremes and Breakdowns. Time to tie them to in-betweens.
On frame 3 the forward foot is still up in the air. We need to put it flatly to the ground (red Arrow). And we'll do it with dialing Foot Roll and Heel Lift (Red Oval) to 0.

On the first look we're done. But if you are going to apply this walk to some path, you'll see the feet sliding. We're not done with the In-betweens. Look closer
The back foot is lifted into the air too soon. Front foot is still on it's Heel, not fully supporting the weight, and the back foot is already up in the air. What's supporting the walker?
Still don't see it? OK.
Look even closer. We are looking at section between frames 12 and 15, while front foot is been brought flat down.

So I would specifically keep the back foot on the ground. Not only that. The back foot is still getting closer to the front. But they both are held by the ground and the distance between them (A and B) should be the same.

A=B !!! Now we're talking... I mean "Walking".
The last, but not least, thing to do is to check if the feet are traveling the same distance and make sure they travel with constant speed while connected to the ground.
Select one of the feet and look at Graph Editor. For convenience we can turn the spline into linear mode (select it and click on the button in Red circle).
Watch if the two segments (Green Arrows) are parallel to each other. It's when the foot is in contact with the ground.

Now load both feet Tz and check if they travel the same distance and segments are parallel to each other.
How to load both feet? Click on one foot controller and Control/click on the other (from Quick Select Sets), then in Graph Editor click on TranslateZ of one foot and Control/click on another. There you are.
Yellow is the one foot's travel and Green is another's. Note that one foot's travel is non-interrupted line, while the other's consists of two segments.
 |
OK, we're almost there. Time to convert the curves back to splines and if we are not careful, we lose our straight segments. Just like below (Yellow lines)

We need to make those segments straight again. Select the keys, then shift/select one tangent's shoulder, shift/select another's, and click the button in red circle (pic1) to get the straight line. (pic2).
pic1. pic2.

Same for another foot and remember, it's grounded section of the curve is NOT split into two parts.

We're done as far as the basics are concerned.
Those folks, who are new to it, should return to the beginning, delete their animation (if you were following these instructions) and attempt to do it again until you can do it on your own in, say, 20 minutes. After this you can continue.
PART 2
Not all is OK with out walk. The knees are clicking, the arms are dead, the body is stiff, the knees are acting funky.
First I'd look if I can fix the funky knees. It's a tough one. One of the most obscured and important elements affecting the knees are the feet flexing. See how waivy Heel Lift graph is? May not look like much but it can be decisive fix. Just kill those two keys and see if it did anything.
pic1. pic2.

Next let's address over-stretching legs. Especially in the "Highs". I can either lower the root or compensate with the Heel Lift. I want to give the knee a little bend. Just to see if I can get rid of the knee snapping. It's relevant only for those rigs, that, like Norman, are not wisely designed. (fixing the problem can be done with such an ease, I'm stupified to see 99.9% of the rigs out there still suffering from it.)

Then we may make his torso concave on the down position (pic1.) and convex on the up(pic 2.). Don't forget to counter-animate the low back when you Rotate the upper body (pic3.). I'm using multiple spine controls at once (pic4.).
pic1. pic2. pic3. pic4.

Then we may drag the head and break the elbow on the forward swing of the arms. The head delay may be covered in separate post and arm swing is covered brilliantly by Richard Williams in his book "Animator's Survival Kit". All and all it looks like this and I'm sick and tired of this topic, so I'll retire.