Friday, September 30, 2011

Keeping the timeline clean

Thing of the major importance (IMHO) is keeping the timeline clean and easy to read.
This will help you to be able to keep changing your shot to very end relatively easy.
I will demonstrate it on the example of Breaking Joint, on pages 151-152 of Animator's Survival Kit.
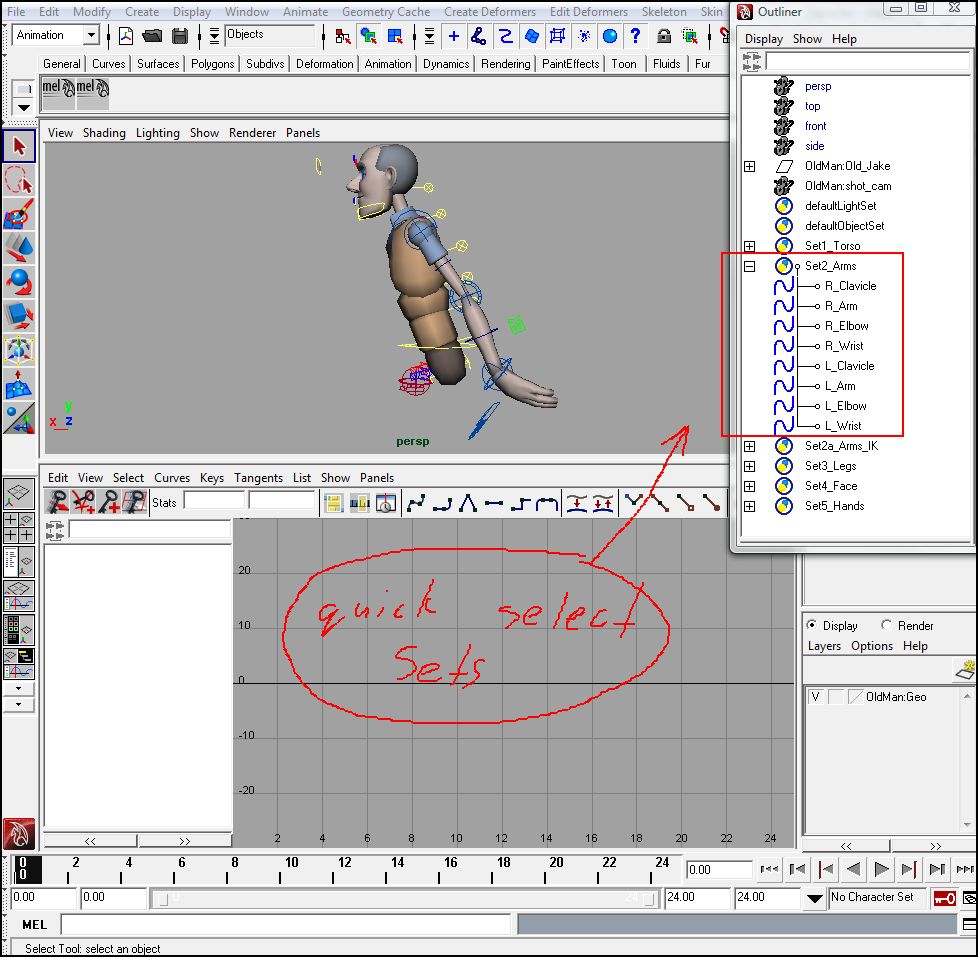
Let's bring Old man (modified Norman model), invis his lower body for simplicity and shape the arm/wrist/fingers into something more or less expressive. Please note that I use Quick Select Sets to pick the controllers. Whoever needs to find how to make those, please visit Quick Select Sets post.
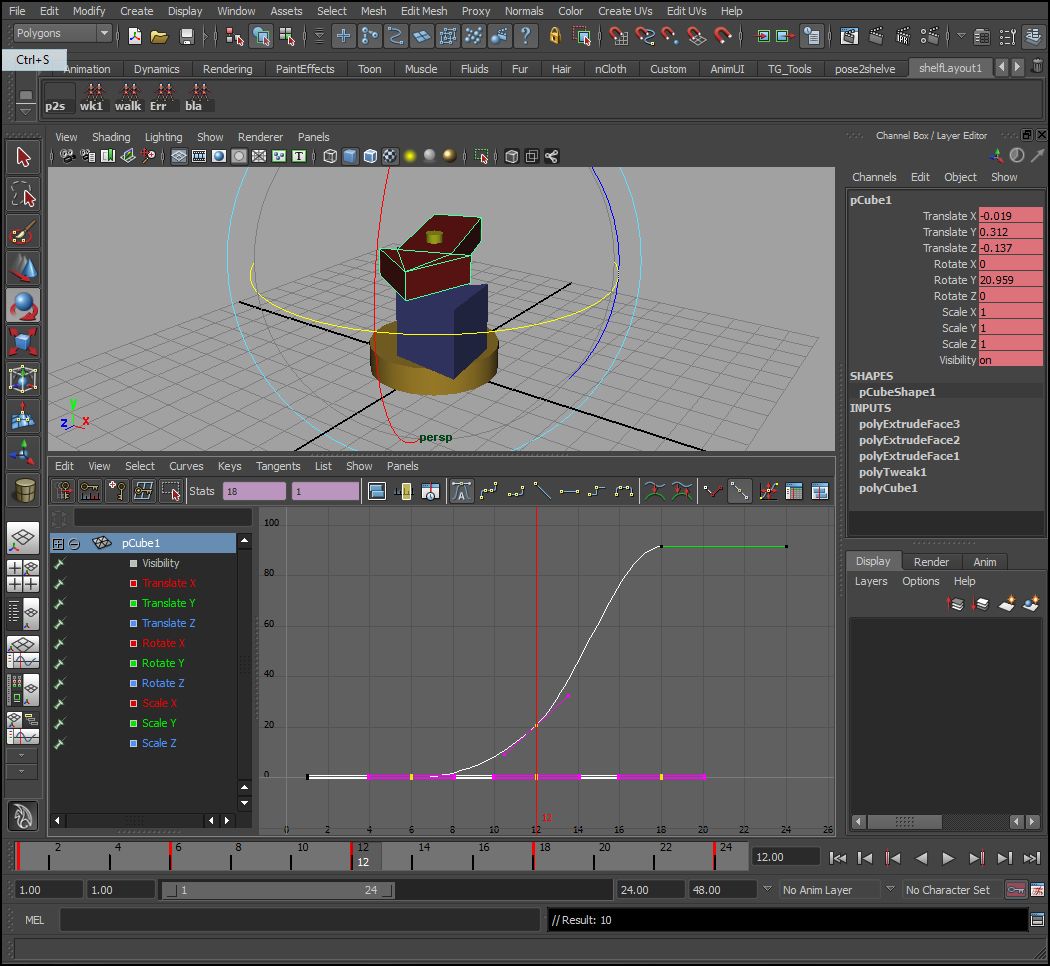
Lets decide it's 24 frames cycle and, having selected all the controllers of the left arm (from quick select set on the right), set the key on frame 0 and 24 
Now let's make another Extreme on frame 12, swing the arm forward.
After I did it, I went to the Graph Editor (GE) and, by using circled button, flattened the tangents. Always pay attention to your tangents, they are not going to accommodate you automatically.
Time for playblast

But we have only created Extremes. Let's make passing postions (Breakdowns), in-between the extremes. (Does  it have to be in the middle? - Not really, but it's convenient if they are)
Not that on the swing forward, on frame 6, I "broke" the elbow to create an effect of "trailing" elbow. It's our first Breakdown.


Another Breakdown on frame 18. I simply bent the elbow a bit more and added flexing on the wrist.


Time for Playblast. Depending on the purpose of the shot and time allocated to it, it may be considered done.

But let's see what else can be done.
I will add an In-between on frame 3 and flip the wrist more upwards. Then I'd keep the wrist in the back-bent position to the next extreme on frame 12. I will have to re-adjust my passing position on frame 6 too.
Note in GE, I moved the whole section of the curve down (red arrows).
Let's compare GE before and after adjustment.

And this is what happened to the wrist:


The same we'll do the the second half of our movement - keeping the wrist in the up-bent position (imagine a feather been blown by the wind).
Time for playblast


It's much more snappy, although I will probably want to tone it down, especially on the back swing.
What else? How about paying attention to the clavicle? Let's move the clavicle with the arm, forward/backward. Note that so far, I haven't put any random key on any spline. I can clearly see my Extremes, Breakdowns and  add necessary In-betweens.  Now I can adjust the clavicles.
Playblast shows that shoulder movement is very mechanical.


Let's add up/down to the clavicles. Where? Where the arms are passing through down position, in the Breakdowns. Look at the GE and note selected up/down Ry curve.
 Everything is organized. 
Playblast shows great improvement


What else? Let's revisit Rz and add Breakdown there too.
Let's compare GE before and after


After I toned down both up/down and forward/backward movements, Playblast shows that we still need
something. How about upper body rotation?


Hmm. Not so bad. I'm done.
And the Timeline?
Let's read it: Frame 0, 12, 24 - Extremes. 6 and 18 - Breakdowns. 3, 15, 21 are In-betweens.


Wednesday, September 28, 2011

Anticipation

Lets do a simple shot with Anticipation, using our previous shot in Overlapping Action post.
First we'll look at frames 6 and 18, our moving holds. Lets, by using MMB drag-n-drop, restore rigid holds on both sides of the shot. Then, by selecting both Arrows, turn them "away" at frame 6 and over-turn at frame 18.We have created Anticipation (frames 1-6) and Overshoot (frames 18-24).


Now it gets interesting. First, we need to recall that frames 1, 6, 18 and 24 are Extremes. Frame 12 is Breakdown. Time to remember simple rule: "Every movement consists of 2 Extremes, 1 Breakdown, and a few In-betweens.
Let's insert Breakdowns between 1-6 and 18-24.


Before working with additional Breakdowns, let's look at the playblast. Doesn't look so bad, but we can add some improvements.
Let us mess with Breakdown on frame 4. To make it feel better I grabbed Extreme on frame6 and moved it to frame7. So my Breakdown is in the middle. Again, circled is the area of my work. I "sped up" Blue arrow and slowed down Red. This way I created Overlapping action not only in the main movement (frame 12) but in the Anticipation as well.


Same thing we can do in the Overshoot Breakdown, frame 21. I sped up Blue Arrow and slowed down Red (to keep it always move after the Blue, dragging behind).  Let's look at it.


Playblast of finished Action is here. We're done.

Overlapping Action

First lets bring simple model with two arrows, red and blue, select them both and set a key on frame 1, to let Maya know I'm animating. Note, I've created Quick Select Sets for the model. (in red oval)


Let's plan our action and create last pose on frame 24. Both arrows should turn screen right.
By default (yours may differ) the curve in Graph Editor (GE) is linear.


Let's fix it and use that wonderful button with letter "A" in it. It's Autotangent. Now we have "Ease-in and Ease-out". 
Looks like we can make our first playblast.
A good idea is not to start your shot from the first frame and end on the last. We need to add some holds.
Use Middle Mouse Button (MMB) for drag-and-drop in the time line to copy frame 1 to 6 and frame 24 to 18. use autotangent button to smooth the curves.


Playblast below:
The keys we have are Extremes. Time to add Breakdowns. Right in the middle, frame 12.


Lets work with breakdown. For simplicity I'll leave Blue Arrow as is, select Red Arrow and drag the knot of it's Breakdown down a little. So now we have Red Arrow moving slower from frame 6 to 12, then picking up speed to frame 18.


The result is:
We produced Overlapping Action of the Red Arrow, but the holds are too rigid. Lets smooth them, using MMB drag-n-drop.


Final version looks like this

Tuesday, September 27, 2011

Using Video Referencing

When we use Live Action Footage for Video Referencing,  or are trying to act it out, we run into two significant difficulties: 1. Not all of us are natural actors and almost none are trained. It naturally leads to very poor performance.   2. Even in the event of great live action footage we may get lost in enormous amounts of details, that I call "life noise".
Luckily there are remedies for both problems: even the worst actors among us are able to create telling poses and we can clean life action footage by selecting and making snapshots of
1. Story point poses
2. Extremes
3. Breakdowns.
Let's illustrate it on the example of Youtube video of simple jump.

1. Whole video reference. I record it from Youtube, using various tools available online, or I'd create my own original video.

2. Having opened it with iMovie scroll through, find Extremes and make snapshots of them


3.Load it into a Movie Maker (or any other editing software), play with timing and record again to create something reminding of blocking in stepped. Only instead of CG character we use life action actor.

Now we don't need the rest of the Life Action and it's tiny details.
All we need is go to Maya and pose the character, using timing of "Snapshots blocking" as the guide.
If it is necessary, we can continue and include snapshots for Breakdowns in the process. I won't take the space with pics, but here is the "Stepped Animatic" with Extremes and Breakdowns. Just for fun, I changed my timing to show that the above version is not the only possibility.